
Featured
Vein Magazine Reader Choice Awards
Looking for a Way to Recognize Your Colleagues? Look no Further Than our Brand New Reader's Choice Awards! We're thrilled to announce the launch of our annual awards program, where readers just like you get to vote for t...Continue Reading
Looking for a Way to Recognize Your Colleagues? Look no Further Than our Brand New Reader's Choice Awards! We're thrilled to announce the launch of our annual awards program, where readers just like you get to vote for t...Continue Reading
Optimal Management for Pelvic Venous Disorders (PeVD)
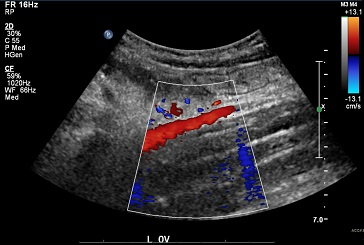
EXPERTS: Dr. Neil Khilnani • Dr. Gloria Salazar • Dr. Mark Meissner Pelvic venous disorders (PeVD), formerly known as pelvic congestion syndrome (PCS), are a common component of many venous practices with women presen...Continue Reading
EXPERTS: Dr. Neil Khilnani • Dr. Gloria Salazar • Dr. Mark Meissner Pelvic venous disorders (PeVD), formerly known as pelvic congestion syndrome (PCS), are a common component of many venous practices with women presen...Continue Reading
What an Exciting 2023 for the Venous and Lymphatic Community
Welcome to the latest edition of Vein Magazine! As we enter 2023, get ready for an exciting year ahead. The American Vein and Lymphatic Society (AVLS) congress and the 2023 International Union of Phlebology (UIP) World Co...Continue Reading
Welcome to the latest edition of Vein Magazine! As we enter 2023, get ready for an exciting year ahead. The American Vein and Lymphatic Society (AVLS) congress and the 2023 International Union of Phlebology (UIP) World Co...Continue Reading

AI Translation at the Upcoming AVLS/UIP World Congress
Breaking Down Language Barriers The Joint International Union of Phlebology (UIP) and American Vein & Lymphatic Society (AVLS) WorldCongress is set to break new ground by introducing an innovative AI translation tool from...Continue Reading
Breaking Down Language Barriers The Joint International Union of Phlebology (UIP) and American Vein & Lymphatic Society (AVLS) WorldCongress is set to break new ground by introducing an innovative AI translation tool from...Continue Reading
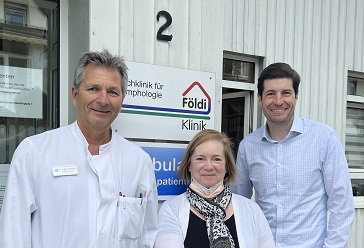
Vicariously Visiting the Földi Clinic
Dr. Manu Aggarwal: Let’s start with your background, specialty, and interests. Dr. Brett Carroll: I’m a cardiologist and vascular medicine specialist at Beth Israel Deaconess Medical Center (BIDMC) in Boston, MA. I d...Continue Reading
Dr. Manu Aggarwal: Let’s start with your background, specialty, and interests. Dr. Brett Carroll: I’m a cardiologist and vascular medicine specialist at Beth Israel Deaconess Medical Center (BIDMC) in Boston, MA. I d...Continue Reading
Screening for Venous Disease with Point of Care Thermography: An International Perspective
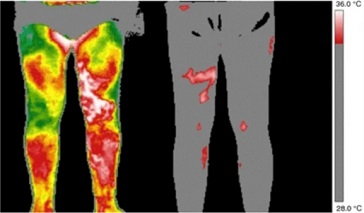
by David Wright, MD, Ariel Soffer, FACS, RCS MD, FACC, Shayna Soffer, Tanya Ramadoss, BBA Screening for Chronic Venous Insufficiency with Point of Care Thermography With the global venous and lymphatic community planning...Continue Reading
by David Wright, MD, Ariel Soffer, FACS, RCS MD, FACC, Shayna Soffer, Tanya Ramadoss, BBA Screening for Chronic Venous Insufficiency with Point of Care Thermography With the global venous and lymphatic community planning...Continue Reading
Varixio: A New Foam Sclerotherapy Device in Europe
VARIXIO is an innovative medical device recently introduced to markets in Europe, South America, and Japan. This highly-versatile device enables the preparation of standardized and high-quality microfoam using commonly-us...Continue Reading
VARIXIO is an innovative medical device recently introduced to markets in Europe, South America, and Japan. This highly-versatile device enables the preparation of standardized and high-quality microfoam using commonly-us...Continue Reading

Get Vein Magazine mailed to your office two times a year for FREE
Subscribe to Vein Magazine
Medical Advisors

Ariel Soffer, MD, FACC
Steve Elias, MD, FACS, FACPh
Antonios P. Gasparis, MD

Ellen Dillavou, MD, FACS

Helane Fronek, MD, FACP, FACPh
Mitchel P Goldman, MD
Get Vein Magazine mailed to your office two times a year for FREE
Subscribe to Vein Magazine
Affiliations
![]()
VeinDirectory is a leading online directory and resource for those afflicted with varicose veins and vein-related conditions.
Copyright © 2024 MH Sub I, LLC dba Internet Brands